I don't consider decor to be a strong point of mine...I can't just decorate on demand, I have to be inspired, and have the right stuff to work with. Once I'm inspired, then I can actually have fun with it!
By yesterday, I had collected enough pieces of the puzzle, and inspiration hit! I was so absorbed in painting and crafting that I completely lost track of time for a while! I may have dropped the ball a bit on mothering, since Zoey didn't eat lunch until 3:30, but I sure was having a good time!☺ (I was going to post this without a disclaimer, but then I thought you should know that she'd had a big breakfast and was sleeping most of the afternoon, and yada yada, so she's fine. ☺)
There are more projects I'd like to do to add to other parts of the room, but this is a big part of what I was hoping for!
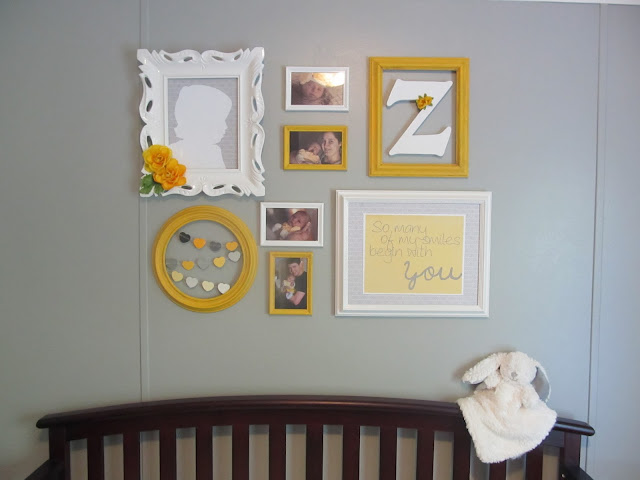
I started off with a conglomeration of frames I'd collected. I've had some of them for years, and picked a couple of the others up at garage sales this summer. The best part is, I spent very little on this whole project...like under $10! I give much credit to Pinterest, as many of my ideas were sparked by pins I've come across in the past!
I'm missing photos for most of the in-between steps, but here's what it looked like this morning:
I got this frame for 75 cents at a garage sale last weekend. Granted, it was an ugly color, and broken when I bought it, but I knew I needed it for this wall! I took a picture of Zoey from the side, which is really hard to do, by the way, with a busy child who will look AT the camera, but doesn't understand looking straight ahead away from the camera! I printed it, cut it out, traced it onto white cardstock, cut it out again, and put it on gray patterned cardstock.
I loved the uniqueness of this round frame the moment I spotted it at a garage sale for 25 cents. Add a little yellow paint and voila! I punched the hearts out of the paint sample strips I had picked up when choosing colors for the walls, and zigzaged them together with my sewing machine!
I have a stash of free digital papers on my computer, so I used those to design this wall hanging. So inexpensive to do!
The rest of the small frames were plastic Family Dollar frames that I'd had for a long, long time! I painted those as well, and put some of Zoey's baby pictures in them! Convenient that she was wearing yellow for that photo shoot! ☺
This arrangement is actually centered on the wall, although those lovely strips make it look otherwise. Prefab home problems. ☺
Here's a really helpful tip I found for hanging an arrangement like this:
Lay everything out on a big sheet of paper (I used wrapping paper).
Mark out where each piece will be, and poke holes where the nails should go.
Tack the paper up to the wall, and pound the nails in.
When you take paper down, all your nails are in place and you can hang everything up, easy peasy! I only had to move 1 nail! It's really great if you're working alone and don't have anyone to hold items up while you stand back and decide on placement! ☺
I called this post part 1 because it's the beginning...I'm not promising a blog post for each future step, but we shall see.
Good day!☺


